“PLC touch screen to control the forward and reverse rotation of the motor is a very important part of PLC programming, so the difficulty is conceivable. Some automation senior engineers also mastered the skills after 4 to 5 series of exercises in the early stage. Today, I will do the forward and reverse exercise of the touch screen control motor for everyone. The materials to be prepared include a touch screen powered by 24 volts, then a network cable interface, a switch for communication between the touch screen and the plc and the computer, a computer, a 24 volt voltage module, and a Siemens smart S7-200 plc Plus two relays.
“
PLC touch screen to control the forward and reverse rotation of the motor is a very important part of PLC programming, so the difficulty is conceivable. Some automation senior engineers also mastered the skills after 4 to 5 series of exercises in the early stage. Today, I will do the forward and reverse exercise of the touch screen control motor for everyone. The materials to be prepared include a touch screen powered by 24 volts, then a network cable interface, a switch for communication between the touch screen and the plc and the computer, a computer, a 24 volt voltage module, and a Siemens smart S7-200 plc Plus two relays.
The experiment begins. First, we power on, the plc light is already on, and then the touch screen is also on. In order to ensure that the plc and touch screen communicate with the computer, they must be set in the same network segment. Here the IP address of the plc is 192.168.0.2, we need to set the IP address of the touch screen to 0.20.
Then we see that the IP of our computer is 0.150, so they are on the same network segment, which proves that they can be connected normally. Before programming, a symbol table should be made. Since there is a forward and reverse rotation of the motor, there should be start and stop, forward and reverse switching, as well as the forward output and reverse output. We use V0.0, V0.1 , V0.2 does this start command, stop command, and forward and reverse switching, then Q0.1, Q0.1 is the motor for forward output and reverse output, and then we start programming.
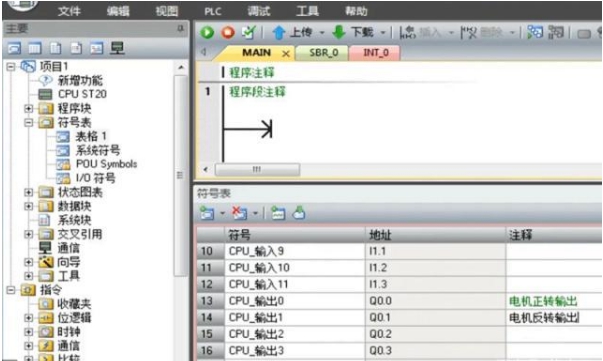
Start programming. First do a startup, V0.0, V1.0, and then do a self-protection, and then do the forward and reverse commands and the forward and reverse conversion commands. Come down and make a coil, Q0.0, Q0.1 and then download. After downloading, monitor to see if the program is running smoothly, you can see that the program is going to the next step and monitoring.
Because our touch screen is flexible V3, so our touch screen software should use Wincc flexible smart, this screen is 700 IE V3. After clicking on it, connect the touch screen to the plc. On top of this connection, we are making some variables based on this connection. Because we are using a switch, this interface should be Ethernet. Since Ethernet is selected, this IP address is required. The touch screen has just been adjusted to 192.168.0.20, and then the plc is 192.168.0.2. Then input these instructions according to this setting, and make variables like the plc first (the V0 that was just made). .0, V0.1, V0.2, and Q0.0, Q0.1).
As for the data type, we chose Boolean. This period is shorter, it scans faster, and we can see the response result faster. The Display here is 100 milliseconds, which is not large enough, and then turn off the left one. Next, we grab the button, the button is at the bottom, There are a total of three buttons here, one is to start, one is to stop, one is to switch, and then there are two status indicators. We copy this, and then rename this button. When selecting an instruction, select it as a press. .
When we are selecting an instruction, we should select this to make the effect of setting the button when pressing down, that is, pressing down to set, and then raising the hand is reset, so let’s take a look at Resetbit and Setbit, in this case The effect of this button can be formed, but if the motor starts and the motor stops, it is the button type, and then switching is not the case, because the switching is done by the program. It should be a stand-alone loop, you can see this in a while.

The Siemens touch screen is more flexible. If you are interested, you can read its manual. It has a lot of tools and can do a lot of things. We can only output the status next, so let’s make a green indicator light. Double-click the selected circle, click its properties option, change the border to green, and then the fill color is also green, and then enable. The next Q0.1 starts, remember to change the appearance attribute, and need to add a comment. When you’re done, take a look at the response on this side of the touchscreen. Because we use two relays to represent the state of the motor, you can see that the touch screen can control these two relays, and then this state enables the touch screen to control the motor.
The Links: G121XCEL01 M170EG01-VF
0 Comments for “How to master the PLC touch screen to control the forward and reverse rotation of the motor”