“Designers of Internet of Things (IoT) products need to continually evaluate platform and component choices to reduce cost and power while improving performance and accelerating the design of connected applications. There are quite a few solutions to choose from, but the challenge for designers is, once deployed, how to perform over-the-air (OTA) updates to keep device firmware updated.
“
Author: Jacob Beningo
Designers of Internet of Things (IoT) products need to continually evaluate platform and component choices to reduce cost and power while improving performance and accelerating the design of connected applications. There are quite a few solutions to choose from, but the challenge for designers is, once deployed, how to perform over-the-air (OTA) updates to keep device firmware updated.
The key is to look at existing platforms and see what additional tools and support they have to support OTA updates. Such support can greatly simplify the process, but may require some attention upfront.
This article discusses the fundamentals of OTA and why it is a key feature that almost every IoT system needs to support, despite the challenges developers face. Then take Espressif Systems’ ESP32 Bluetooth and Wi-Fi-enabled microcontroller and related modules, kits, and ESP IoT Development Framework (ESP-IDF) as an example to show how to create an OTA partition and use the otatool.py script in the application Perform firmware update while still running.
Introduction to OTA Updates
The core focus of most development teams is to implement the specific functionality of their product, i.e. product differentiation business logic. However, every IoT product has a basic feature set that needs to be deployed, configured and maintained throughout the life cycle of the device. Security updates are a good example. Given the need to perform these updates, an important but easily overlooked feature when evaluating a suitable development platform is the bootloader or firmware OTA (FOTA) update (sometimes just called OTA) capability.
OTA provides engineers with the ability to remotely maintain and upgrade their products according to technical and business requirements, without the need to send maintenance personnel to the device or have the end customer proactively make some updates to the device. Instead, all of these costs can be eliminated by having the device upgrade its firmware silently in the background or during “downtime” such as midnight operation.
OTA architectures can come in many different forms and configurations, from custom solutions all the way to standard implementations provided by cloud providers. A typical architecture example can be seen in Figure 1.
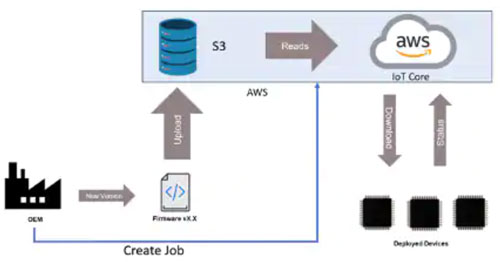
Figure 1: Overview of the OTA architecture showing an example process of updating application firmware to deployed devices in the field. (Image credit: Beningo Embedded Group)
In this example, an OEM uploads a new firmware version using the Amazon Web Services (AWS) IoT kernel, and then deploys the update to devices in the field using the built-in job functionality. This is just one example of many, nearly every cloud vendor has a similar solution.
There are many OTA-enabled microcontrollers to choose from today. A popular microcontroller for low-cost systems and manufacturers is the ESP32. There are several reasons why the ESP32 is so popular:
・It has an integrated microcontroller and a Wi-Fi/Bluetooth authentication module is available
· low cost
・ Open source development environments and software frameworks such as ESP-IDF and ESP Audio Development Framework (ESP-ADF)
・ Many existing application examples are freely available online
・ Choose an ESP32 module for OTA testing
There are several different ESP32 modules and development boards available for purchase to get an OTA example. Take the Adafruit 3405 ESP32 Huzzah Feather board as an example (Figure 2). This is a low-cost development board that includes all the circuitry to program the ESP32 and power it through a single USB connector.
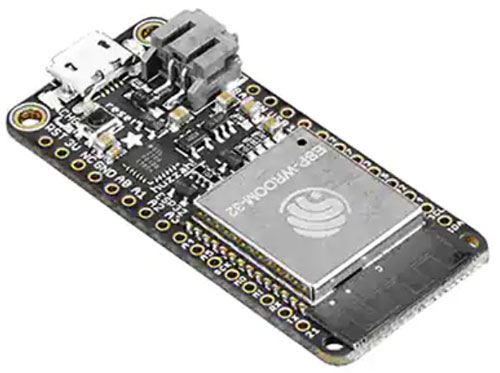
Figure 2: The 3405 Huzzah Feather board contains an ESP32 WROOM-32D certified Wi-Fi/Bluetooth module with 4 Mb of flash memory. The board includes all the necessary hardware to program and communicate with the module via USB. (Image credit: Adafruit)
At the heart of the 3405 is an ESP32-WROOM-32D module equipped with 4 Mb of flash, Wi-Fi, Bluetooth and a complete set of peripherals for almost any application.
Another development board that can be used is the ESP32-LYRATD-SYNA audio board from Espressif Systems (Figure 3). The development board includes the ESP32-WROVER-B module.
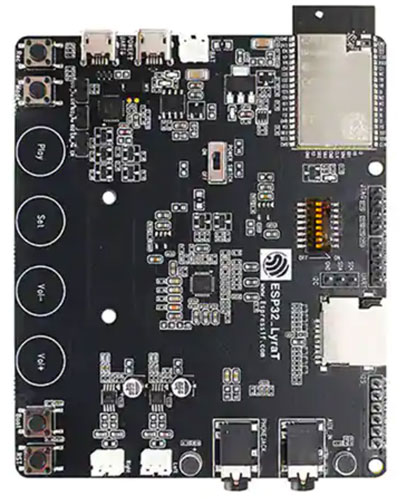
Figure 3: The ESP32-LYRATD-SYNA board is based on the ESP32 WROVER-B certified Wi-Fi/Bluetooth module with 4 Mb flash memory. In addition to enabling designers to program and communicate with the module via USB, it also has the circuitry needed to develop audio applications. (Image credit: Espressif Systems)
The ESP32-LYRATD-SYNA module also has 4 Mb of flash, and all the circuitry for audio applications. The board includes an audio codec, an audio amplifier, and headphone and speaker jacks to fully test audio applications.
The last board available for OTA testing is Espressif’s ESP32-S2-SAOLA-1RI board (Figure 4). When it comes to development boards, this one is the least expensive. The board contains an ESP32 Wrover module, and circuitry to program the chip. There are no frills other than the pins it contains that can be easily dropped onto a breadboard for testing.
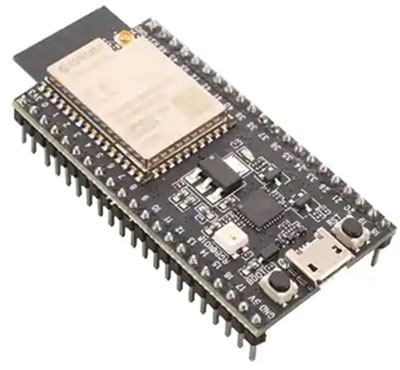
Figure 4: The Wrover module based ESP32-S2-SAOLA-1RI is a bare development board that is low cost but includes enough circuitry to program the onboard modules. (Image credit: Espressif Systems)
The specific board chosen for testing doesn’t really matter, since every ESP32 module utilizes ESP-IDF. This framework is designed to simplify software development activities for developers by including drivers, middleware, RTOS, and the bootloader and OTA libraries that are important to this article.
The bootloader allows developers to take advantage of OTA updates and partition memory to update firmware while the main application is still running, helping to minimize downtime. The bootloader setup may seem complicated at first, but when guided properly, it’s simple.
OTA development workflow
The OTA development workflow for the ESP32 will vary slightly based on business needs and product component selection. For example, a team leveraging AWS might use AWS’s getting started guide and examples to launch their ESP32 OTA solution. On the other hand, a company that is customizing its own solution might also take advantage of the ESP32’s documentation. In this article, we’re going to look at the ESP32 level, not in the cloud. The reason is that these are generic and applicable to the OTA of the ESP32 regardless of which cloud provider or solution is used.
In general, the process of setting up an OTA update on an ESP32 consists of the following steps:
・ Configure ESP32 partition table
・ Download firmware that supports OTA
・ Develop a tool that acts as a server and pushes new firmware
・ Download the latest firmware to the ESP32
・ Swap to new application
Obviously, this is a simplified approach. Developers should review Figure 1 again to understand the entire firmware update process. This process can be quite complicated, so it is recommended to utilize an existing ESP32 OTA instance located on GitHub. These examples provide several key instances such as:
・ HTTPS OTA
・ Local OTA
・ Simple OTA
Figure 5 shows the steps of the deployment and update process. The developer needs to perform the red steps first to deploy the OTA solution to the ESP32 module. The steps in orange are the next steps, which are performed to advance the OTA update.
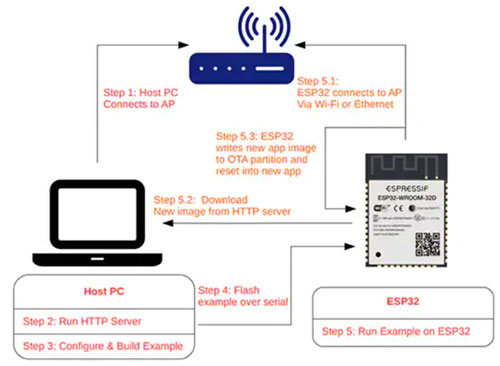
Espressif Systems OTA update example diagram
Figure 5: The Espressif Systems OTA update example on GitHub provides a few simple examples for developers to perform an OTA update on their ESP32. (Image credit: Espressif Systems)
Configure an ESP32 application for OTA
The ESP32 contains a partition table that describes what type of data resides on the microcontroller and where it is located. For example, a standard ESP32 partition table looks like Table 1.

Table 1: The standard ESP32 partition table shows the type of data and its location on the microcontroller. (Table source: Beningo Embedded)
There is a factory application, then the NVS library and physical layer (PHY) initialization (init) data section. In order to use the OTA functionality, this table needs to be updated to specify the memory location for OTA update firmware in addition to the main (factory) application. For OTA, there are usually two partitions allocated for updates. One is the firmware being updated and one is the firmware being downloaded, which will be the latest version. This allows the factory application to remain unchanged. The updated OTA partition table will look like Table 2.
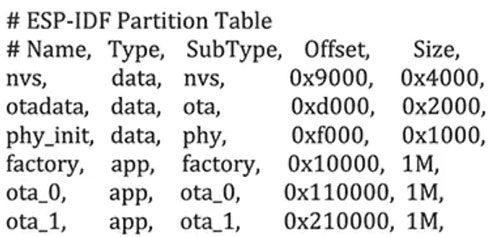
Table 2: Typical ESP32 update OTA partition table. (Table source: Beningo Embedded)
As shown in the table, there is now an ota_0 and an ota_1 application section, which is 1Mb in size, and a data section (otadata), which is RAM allocated for the update process. This table can be modified and updated by the developer to suit the application.
In order to run the OTA examples, there is a set of simple instructions listed in the “How to use the examples” section on GitHub. This section describes how to build and program the application.
There is also otatool, which can be used to update firmware. This script is typically used to:
・ Read, write and erase OTA partitions
・ Switch the boot partition
・ Switch to factory partition
The example script can be executed by running the example in the terminal using the command.
./otatool_example.sh
Or use Python.
python otatool_example.py
When it comes to configuring the ESP32 for OTA, ensuring the partition is set up is a critical step.
Tips and tricks to use
The EPS32 OTA solution can speed up and simplify developers’ firmware update scenarios. To prevent the solution from becoming a development burden, there are several “tips and tricks” that should be kept in mind.
• If possible, leverage existing OTA frameworks included with the company’s cloud provider. This can greatly simplify development and integration.
・Use a low-cost development board to test OTA functionality and bootloaders. The ESP32 has several options and it may take some experimentation to determine which one is best for the application at hand.
・ For custom solutions, take advantage of the ESP32 OTA instance on GitHub.
・ For applications where the product is used as a Wi-Fi router or hub, consider downloading the firmware image to external storage and performing the update from a mass storage device.
・ Take some time to review the ESP32 documentation on the partition table. This is a bit different from typical microcontroller implementations.
・ For security reasons, it is best to disable application rollback. If an application can be rolled back to a previous version, it is possible for a potential attacker to push a version with a known vulnerability and compromise the system.
Developers who follow these “tips and tricks” will find that they can save a lot of time and pain when trying to take advantage of the ESP32 or any other OTA solution.
Epilogue
OTA updates are an important feature of a growing number of IoT and embedded systems. Developers need to have a good grasp of how this functionality can be implemented efficiently in order to save up-front time during the design and development process and after the product leaves the factory.
The ESP32 wireless microcontroller has been widely used in various types of devices, and as mentioned above, it has an off-the-shelf OTA solution. By leveraging ESP-IDF and related modules and platforms, and using some experience-based tips and tricks, developers can greatly reduce their design time and get their OTA solutions up and running reliably.
The Links: LJ32H028 UCD9090RGZR

0 Comments for “How to perform over-the-air (OTA) updates using an ESP32 microcontroller and its ESP-IDF?”