【Introduction】When using Arduinos and Raspberry Pis to control LEDs and motors, you need to use a driver circuit that includes resistors and transistors. In circuit experiments, it is convenient to freely combine resistors and transistors, but when making large circuits with a complete Electronic kit, it is best to minimize the number of components to avoid contact defects or connection errors.
We now introduce a “digital transistor” that helps reduce the number of electronic components used, thereby increasing reliability and reducing cost.
content
‧ Digital transistor with built-in resistor
‧ Why do transistor switches need resistors
‧ How to use digital transistors
‧ How to choose a digital transistor
‧ Digital Transistor Summary
Digital transistor with built-in resistor
A digital transistor is an electronic component with a resistor built into the transistor package.
In order to turn on LEDs or operate relays via microcontroller boards (such as Arduinos or Raspberry Pis), a driver circuit (switch) with transistors and resistors is required. The driver circuit is simple, but requires a resistor to limit the current flowing through the base.
Since the resistor is built into the digital transistor, a single transistor can be used directly to form a drive circuit.
ROHM is the first semiconductor manufacturer in the world to develop what is known as a “digital transistor”. Today, other companies also sell such products, called “resistor built-in transistors.” For simplicity, it is sometimes called “digi-tra”.
Why do transistor switches need resistors
Before explaining the advantages of digital transistors, let’s take a quick look at why transistors need resistors. There are many types of transistors, but here we only explain the principle of bipolar transistors.
In order to control the ON/OFF of the transistor, it is necessary to pass current through the base. If a voltage is applied to the base, a current will flow, but if this continues, the load current will increase exponentially with the voltage, so even a small voltage change can have a big effect. In the worst case, the transistor or microcontroller can be damaged, or it can fail due to a small amount of static electricity, becoming a hidden danger.
Therefore, in order to make the bipolar transistor work stably, an input resistor needs to be connected to its base to limit the current applied to the base.
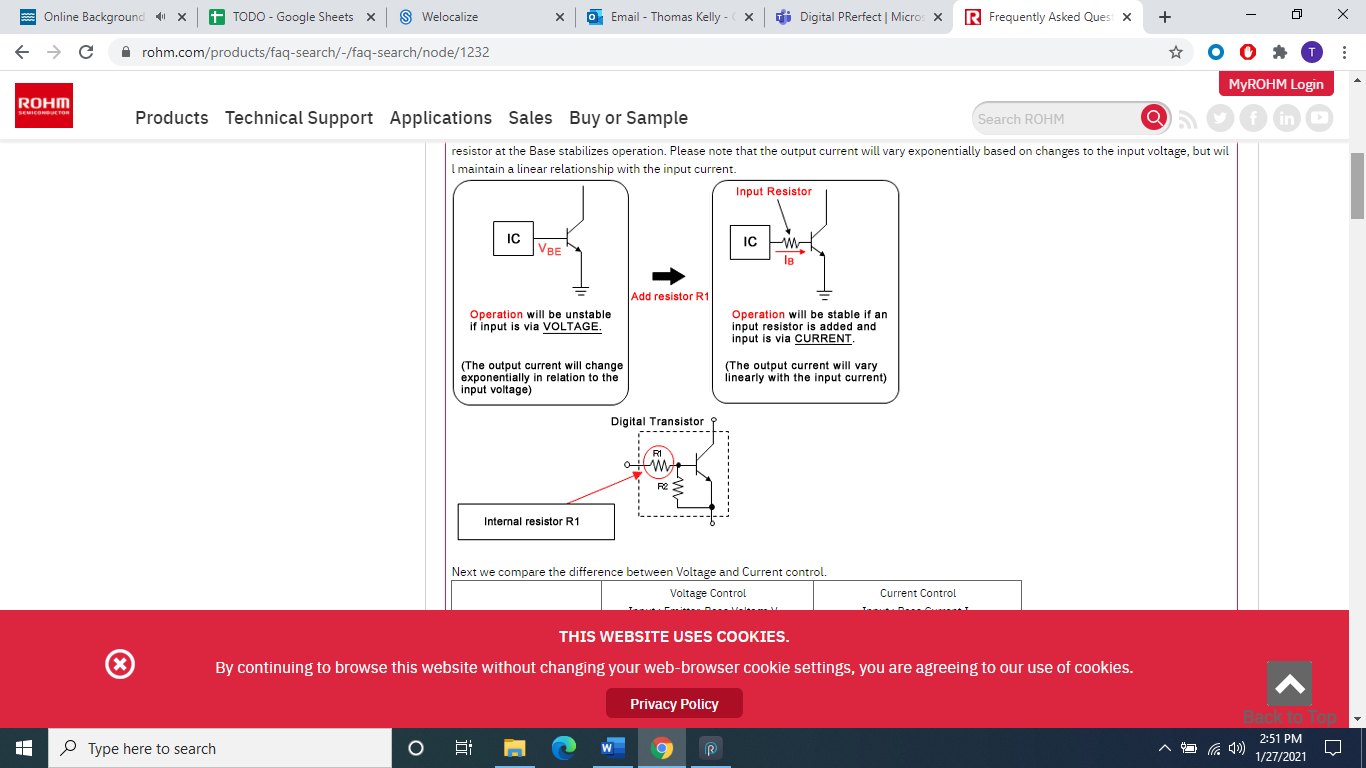
Reference: Please tell me the working principle behind the digital transistor (Digi-tra)|ROHM Co., Ltd.
How to use digital transistors
A digital transistor appears to be a very simple electronic component – just a resistor built into the transistor. But when you try them out for yourself, you’ll start to see their benefits.
There are many benefits of using digital transistors, including “reduced mounting size (miniaturization of circuits),” “reduced component count (reduced mounting costs),” and “improved reliability.”
As an example of a digital transistor in action, the following two figures compare the changes in circuit size when making an LED lighting circuit.
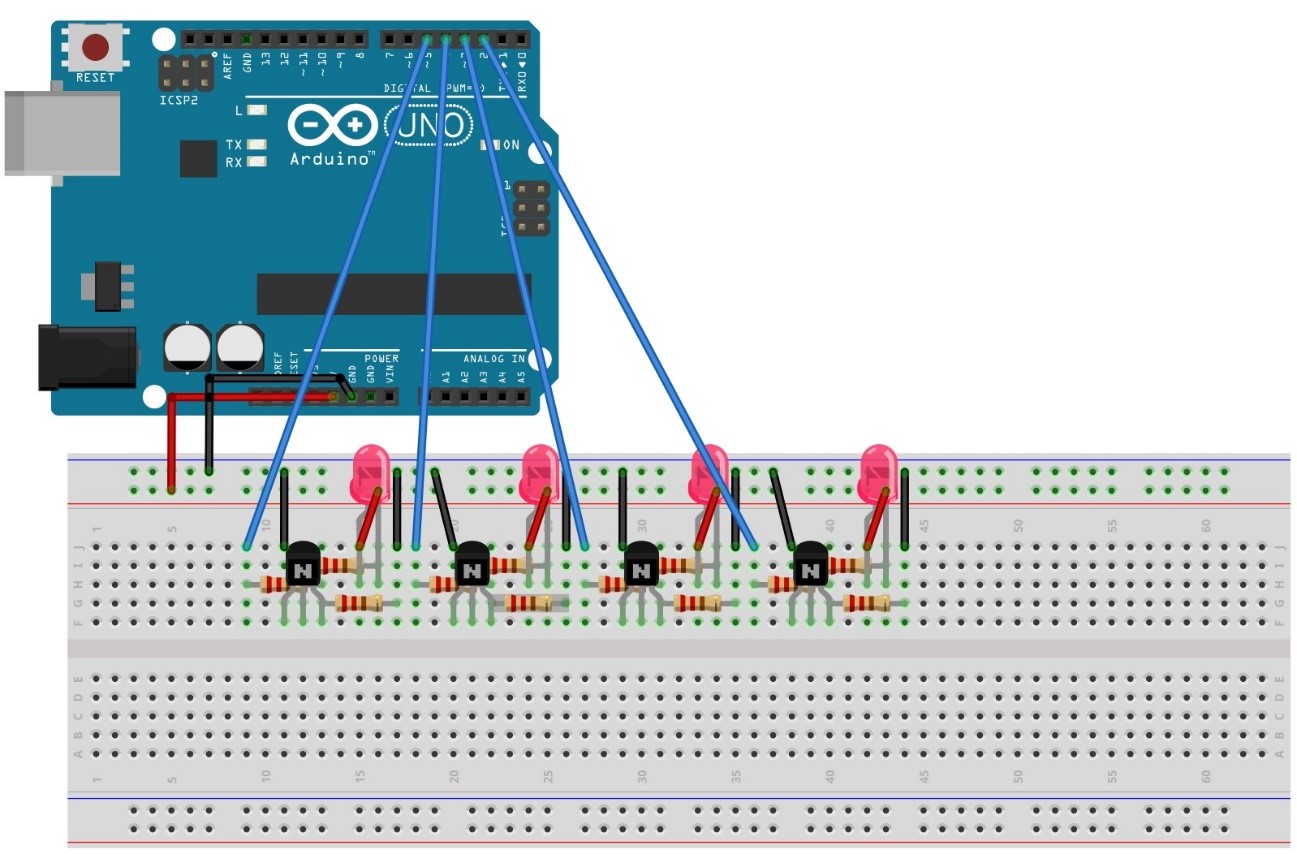
Example of 4 LED driver circuits using common transistors.Resistors used to limit base current complicate component placement and routing
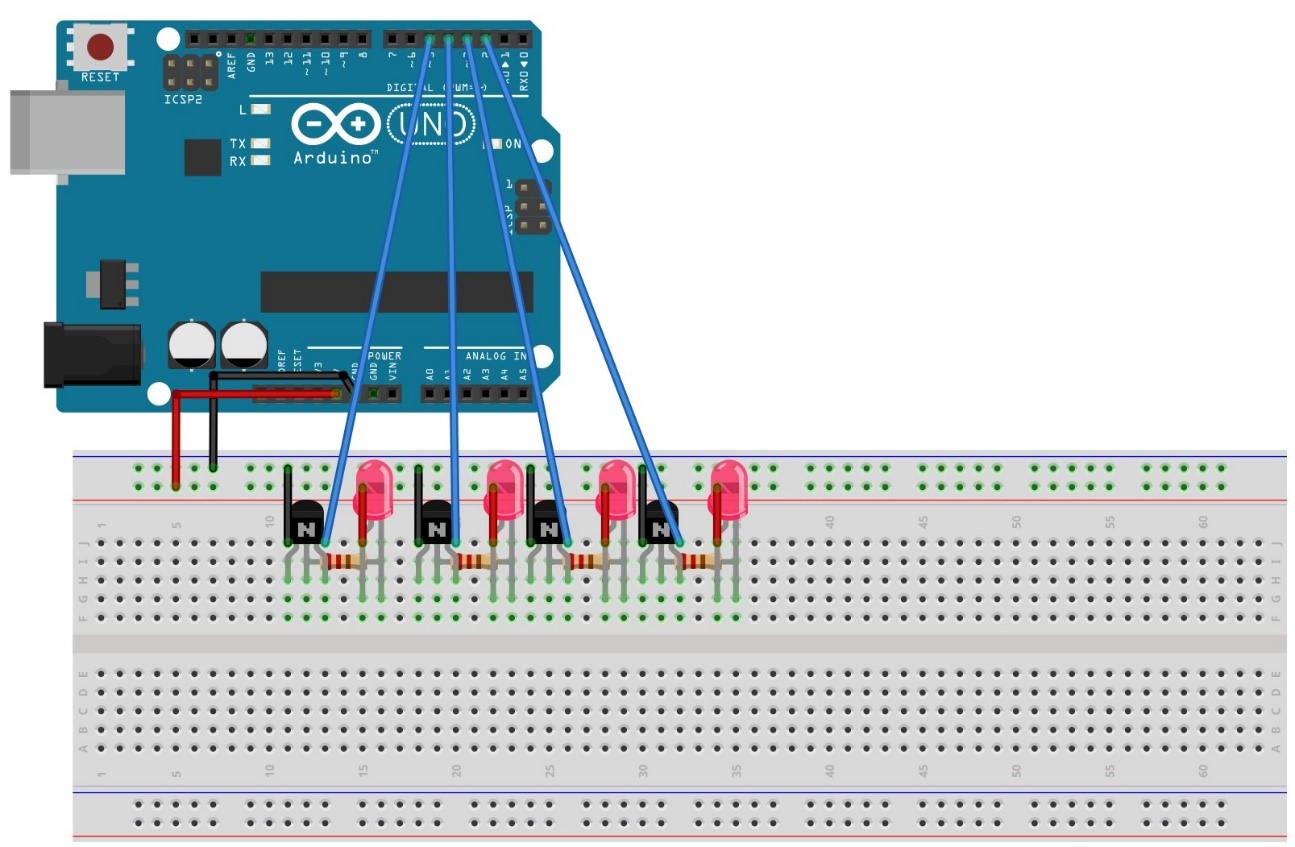
If digital transistors are used, the resistors can be eliminated and the circuit size can be reduced, thereby saving space and reducing the amount of wiring, which means that more functions can be added in the same area, and the occurrence of wiring failures can be reduced
With ordinary transistors, 18 wires and 20 electronic components are required, but if you switch to digital transistors, the number of wires can be reduced to 14 and the number of electronic components can be reduced to 12. Because of the reduced component count, the effort required to insert components into the breadboard is also reduced by about 30%.
Reducing wiring also reduces problems associated with poor contact and wiring errors. This is a breadboard example, but when it comes to mass-producing the circuit for an actual product, even one component reduction can have a significant cost reduction effect. As such, digital transistors are electronic devices that can easily be implemented to reduce cost and improve circuit reliability.
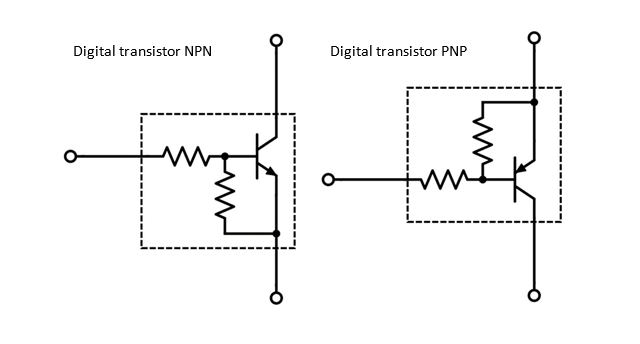
In circuit diagrams, transistors are usually surrounded by dashed lines, and symbols are used to indicate that transistors and resistors are built into an electronic device. The component numbers on the circuit diagram are represented by DT1, DT2…etc.
How to choose a digital transistor
Digital transistors are of different types depending on the collector current and the resistance connected to the base. Digital transistors are selected in the same way as to determine the resistance connected to the base when using a normal transistor as a switch. (See more about Ohm’s Law, GPIO and Transistor | DevicePlus article on how to calculate resistance through LED blinking on RasPi)
The Digital Transistor Selection Tool can be found on ROHM’s Digital Transistor product page. If you input the four parameters of polarity, power supply voltage, input voltage, and output current, the most suitable three-stage transistor will be automatically selected, so if you are not sure how to choose, you can try this method.

Digital Transistor Selection Tool ROHM Co., Ltd.
Digital Transistor Summary
When you hear the word “digital transistors” it may feel more complicated than normal transistors, but in reality they are just simple electronic components used for switching work, and as you can see, this device is actually very easy to use .
Even in breadboard electronics kits, the use of digital transistors can reduce the number of components used and problems such as contact defects. Furthermore, there are many benefits to be gained from using this electronic device, even in small-scale electrical work and work verification.
Digital transistors are also highly recommended for those who often use transistors for switching work.
The article is from a translation of the English website of DevicePlus.com.
The Links: AT24C512B-TH-B NL2432HC17-07B

0 Comments for “Reducing Component Count Using Digital Transistors: The First Steps to Making Simple Circuits”